STEP BY STEP EXPLANATION
The Sun Salutation or Surya Namaskar steps are performed in a flowing motion as a way to warm up the body and increase blood circulation.
Every sun salutation step is linked to an inhale or exhale, the inhales focusing on lengthening and extending, and the exhales on bending and strengthening.
The key to the sun salutation steps is the fluent motion in which you perform this sequence of poses. You should not stay still, so even if the explanation seems long, it is important you perform every part – and in between every part – in a flowing motion.
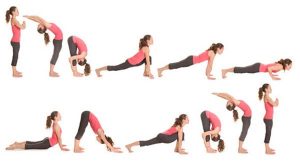
The Sun Salutation Pose can be done by:
1. Start by standing tall with your arms relaxed to the sides. Your feet can be together or hip-distance apart. Take a couple of breaths here, before starting flowing to find an equal inhale and exhale. You want to try to maintain the same length of the breath throughout the sequence.
2. On the next inhale, circle the arms upwards towards the ceiling, gazing up towards your thumbs.
3. Then exhale, as you draw the abdomen in and fold forward, as you circle the arms all the way down to the ground. If you need you can bend the knees so that your hands can rest on the floor. Keep the head heavy.
4. Inhale again and lengthen the spine halfway up, so your torso is parallel to the floor and gazes forward. If needed your fingers can lift up from the ground here so that your spine can completely straighten.
5. Now place the palms of your hands on the floor, bending the knees if you need as you exhale and step or lightly jumping back into the plank pose. On the same exhale bend the elbows and lower the body halfway down, keep gazing forward.
6. Then inhale, as you roll over your toes and bring your chest forward and up, straightening your arms. Press your feet into the floor, as you keep the abdomen in and chest opening.
7. Exhale, rolling over your toes and lifting your hips up and back towards the downward-facing dog pose. Keep your abdomen drawing in and allow the front of your shoulders to open, gaze back towards your belly.
8. Inhale and slowly walk, step or jump your feet towards your hands, as you lift the chest halfway up, gazing forward. The abdomen is drawing in and again if needed, allow your fingertips to lift from the floor.
9. Then exhale again and fold forward from the hips, dropping the weight of your head down. Keeping a slight bend in the knees.
10. Then, on an inhale, circle the arms up as you come all the way back up to standing and gaze up towards your thumbs, palms together.
11. Exhale, circle the arms back down alongside your body.
12. You can repeat this another three or five rounds until you feel warmed up and ready to approach some of the other poses.
CAUTIONS Read the following cautions to stay safe: • If you are concerned about anything of this pose, please contact your physician on whether this practice is good for you.
MAKING THE POSE EASIER • You can always begin by trying out the tutorials for the individual poses, and then, once you feel confident with these, link them together with flowing breath. So first try the video tutorials for the Mountain Pose, the Standing Forward Bend Pose, the Plank Pose, the Low Plank Pose, the Cobra Pose, and the Downward-facing Dog Pose.