According to the Mayo Clinic, an olive oil cleanse is an alternative medicine therapy used to rid the body of gallstones and detoxify the liver. While there is no standard recipe for an olive oil and lemon juice cleanse, most practitioners only consume 1 or 2 tablespoons of olive oil with a fruit juice, like lemon juice, for two or three days.
” Thank you Doctor Mandel, yes I’ve been using this formula for about a week now, and it’s been very helpful for my stomach and I’m more regular than before. And it is good to know all of the other health benefits. Thanks once again and Doctor Mandel “Make it a Great Day!” May Christ Jesus bless you and your family. Amen..”
how to cleanse liver with olive oil and lemon
There are many health benefits you will experience when drinking extra virgin olive oil and lemon on an empty stomach first thing in the morning.
Buy Extra virgin olive oil of the first cold press.
how to cleanse liver with olive oil and lemon
An olive oil cleanse may help you lose weight quickly because it will not provide you with the daily required calories and nutrients. While many proponents proclaim the benefits of an olive oil and lemon juice cleanse, there are few conclusive studies that support the practice as beneficial.
Moisten the potting soil so that it is damp, but not soaked, all the way through.
Fill the smaller pot with soil, all the way up to an inch below the rim.
Cut open your lemon and remove a seed. …
Do not delay to plant. …
Spray the soil that is directly above the seed gently with water from a spray bottle.
Here’s how you grow your own lemon tree
Firstly you’ll need
An organic lemon since non-organic lemons often contain non-germinating seeds
Fertile potting soil, and natural fertilisers like compost
A seedling pot that is about 24 inches wide by 12 inches deep
A planting pot that is six inches wide and six inches deep (this comes in handy further down the track)
A sunny, indoor growing location
how to grow lemon tree from seed
WHEN LIFE GIVES YOU LEMONS, MAKE TREES!
Next time you’re sucking on a lemon save a few of the seeds to grow into your own tree. Even in the colder months, a productive lemon tree can be growing inside of your home. They are beautiful in appearance, from their dark-green leaves to snow-white blooms, and they also emit a pleasant, refreshing fragrance.
Growing a lemon tree from seed is surprisingly straightforward, and something that anyone can do if they have a warm, sunny windowsill. It will take a few years to before it fruits and flowers but eventually your hard work will pay off. Citrus will grow in all parts of Australia except areas that experience severe frost.
Citrus trees have big benefits
They can produce gloriously perfumed white flowers, sport glossy, green leaves and brightly coloured fruit – yellow, orange and green
Fruit holds on the tree in good condition for many months after ripening providing long-term self-storage
Citrus fruits are rich in vitamin C and are great for winter health including resistance to colds and flu
how to grow lemon tree from seed
Directions
Moisten the potting soil so that it is damp, but not soaked, all the way through.
Fill the smaller pot with soil, all the way up to an inch below the rim.
Cut open your lemon and remove a seed. Remove all of the pulp from its surface. A good way to do this is to simply suck on it until it is clean.
Do not delay to plant. The seed must still be moist when it is buried into the soil in the smaller pot. Plant the seed about half an inch deep in the middle of the pot.
Spray the soil that is directly above the seed gently with water from a spray bottle.
Cover the pot with clear plastic wrap, seal the edges with a good rubber band, and poke small holes in the top with a pencil.
Place the pot in a warm, sunny location.
Spray on more water occasionally, not allowing the soil to dry out. Do not cause water to puddle though. Just keep the soil somewhat moist.
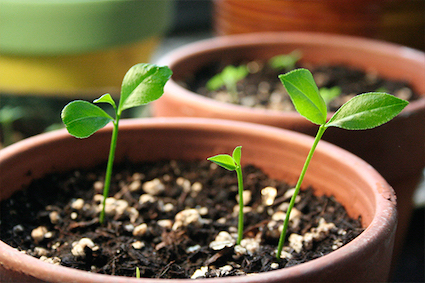
After about two weeks, when the sproutling emerges, take the plastic covering off. If you need additional light for your lemon plant, you can use a grow light to supplement the sun’s light.
Take care of the young plant by keeping the soil damp, by making sure it gets at least eight full hours of light per day, and by giving it moderate doses of organic fertiliser like compost.
Watch over your plant to ensure it is not attacked by bugs or diseases. Prune off brown, dead leaves when necessary.
When the plant outgrows its small pot, put it in the larger pot. You will go through much the same procedure when you re-plant it as when you first planted. Younger plants need more water than older plants, but they all do need adequate water. Don’t starve your poor plant after all that work of growing it!
Grow you earnings with Paymara –
1.5% daily (weekend is not included) with Paymara – professional, legit, licensed in Canada and the USA – company.
Even if you’ve never made a cent online or have no idea what any of this means…!
I will provide you with tools, traffic resources, our team Telegram chat – learn more here or send me emoji, comment.
6. Rinse out several times until the smell of vinegar has vanished
7. Wipe down the outside of the kettle with a damp cloth
Using vinegar to remove limescale is non-toxic and detergent free.
To prevent limescale pour out any excess water from the kettle when you have finished using it. It is also possible to purchase a kettle descaler, which is a steel mesh ball that collects limescale when placed inside the kettle.
1
Mix 2 cups (470 mL) of vinegar and water and pour them into the kettle. If the volume of your kettle is too small for this mixture, fill it about halfway and place any leftover solution to the side. For best results, use white vinegar and water in a 1:1 ratio.[1]
If yours is an electric kettle, make sure it’s unplugged before pouring in the water and vinegar.
It’s a good idea to check the owner’s manual for your particular kettle to make sure that it’s safe to add vinegar to the interior.
Tip: There are commercial descalers available, but make sure they are specifically for use on kettles and are not metal descalers. If you choose to use one, follow the manufacturer’s instructions.
This build-up causes water to take longer to boil and can even lead your kettle to burn out in the long run.
Fortunately, if you begin to notice limescale build-up in your kettle, you can easily use vinegar or lemon juice to get rid of it.
2 – with vinegar
Turn the kettle on and bring the vinegar solution to a boil. Plug in the kettle if it’s electric or turn on the stove underneath a stovetop kettle to boil the solution. Let the solution boil for about a minute or so.[2]
Feel free to use a high heat setting to bring the solution to a boil as quickly as possible. It shouldn’t take longer than 5 minutes to get it boiling.
Turn off the kettle once the solution is boiling and let it sit for an hour. The vinegar solution will do work its descaling magic simply by sitting in the kettle, so you don’t necessarily have to boil it for a set amount of time. If you don’t want to wait an entire hour, allow the solution to sit for at least 30 minutes before pouring it out.[3]
If yours is an electric kettle with an automatic switch-off feature, feel free to let it switch off on its own instead of watching to see when it boils.
How To Descale A Kettle
To descale a kettle, fill it with a mixture of 1 part white vinegar and 1 part water (one cup).
Leave the vinegar mixture in the kettle for 1 hour.
Then, dump it out and wipe down the inside of the kettle with a clean rag.
Once all the lime-scale is gone, rinse your kettle out with water 5 times, and voila.
4
Pour out the solution after an hour and rinse out the kettle. Be sure the kettle is cool to the touch before handling it. Thoroughly rinse the inside of the kettle under the sink faucet to get rid of any leftover vinegar solution. For best results, rinse out the kettle 2 or 3 times to get as much of the vinegar out of the inside as possible.[4]
If your kettle has a removable lid, take this lid off to make it easier to rinse out the interior. You can rinse the lid by itself to make sure it’s also clean.
5
Use a clean, damp cloth to wipe away any leftover limescale. The vinegar solution will probably not have removed all the limescale, but any leftover build-up should be easy to remove by hand. If a damp cloth isn’t cutting it, add a little bit of baking soda to a damp sponge and use that to clean out the inside of the kettle.[5]
For best results, use a microfiber cloth or a cleaning brush with an elongated handle. Make sure you get all the corners as well.
6
Run a plain water cycle to get rid of any lingering vinegar taste. Fill your kettle halfway with plain water and bring it to a boil. Pour this water out once it starts to boil. You may have to do this 2 or 3 times in order to completely deodorize the interior.[6]
Repeat this cycle until you can’t smell any vinegary odor in your kettle. You may also want to “test” your kettle by preparing a beverage in it and seeing if it tastes at all like vinegar.
You can change your financial situation to the better state this year – 2022 – see how HERE >>
6
Run a plain water cycle to get rid of any lingering vinegar taste. Fill your kettle halfway with plain water and bring it to a boil. Pour this water out once it starts to boil. You may have to do this 2 or 3 times in order to completely deodorize the interior.[6]
Repeat this cycle until you can’t smell any vinegary odor in your kettle. You may also want to “test” your kettle by preparing a beverage in it and seeing if it tastes at all like vinegar.